Game Manager
Checking the State
The game manager has three states that it can be in and is displayed in the top bar as follows:
· Not Connect – (red) which states that the game manager is not connected to the game engine, normally meaning the game engine is not running, please start the game engine and it will then automatically connect itself.
· Connected – (green) which states it is connected to the game engine and is ready to go.
· Game Running– (blue) this states that it has connected successfully with a game plugin and is sending data to the game engine which in turn will be sending data to the interfaces if you have set them correctly.
These three states help you recognize what process step the Game Manager is in.
Patching a Game for Motion
In order to use the plugins we have previously installed with the SimTools Game Plugin Updater we must patch the game for motion. Here we will just set the game plugin that comes supplied with SimTools before we had installed any other plugins in Resource section on the website with information on the directory you need to select in order to successfully patch the game for motion.
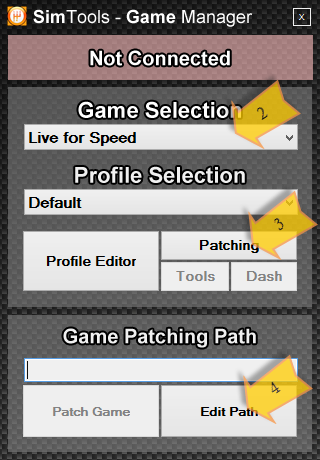
To patch Live for Speedtm we do as follows:
- Open Game Manager from the system tray if not already open.
- Select Live for Speed from the game selection drop box.
- Press Patching.
- Press Edit Path.
You will now notice another window open as asks you to select the Live for Speeds installation directory.
- Now press Ok to continue.
- In the Browse For Folder window, select the directory you installed Live for Speedtm.
- For example mine was C:\LFS\LFS. On pressing OK the path is transferred back to the Game Patching Path, if you have selected the wrong path it will say so too.
- Press Patch Game.
- You will then be asked to confirm that you want to patch the game selected.
- Press Ok to patch the game for Motion.
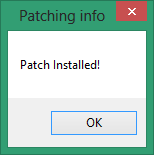
- Again if successful you will be notified that the patch installed.
- Press Ok to finish.
This can now be repeated for each game you have installed via the Plugin Updater.
Please note if you change the game plugin or update the game plugin you will need to first remove the patch as follows:
- Open Game Manager from the system tray if no already open.
- Select Live for Speed from the game selection drop box.
- Press Patching.
- Press Remove Patch.
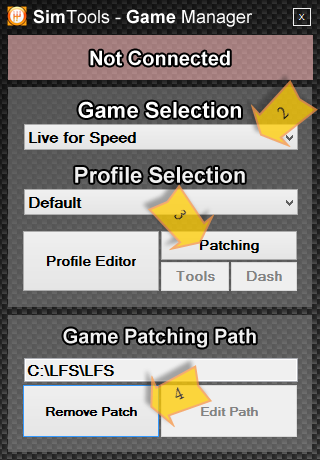
On pressing Remove Patch you will be asked to confirm that you want to Remove the Patch for Motion ‘Live for Speed’? Select Ok to continue. Again a confirmation like below lets you know that the operation was a success. Press Ok to complete this and you will now see that in the Game Patching Path is now not set and the Edit Path button is now selectable.
Now you are free to update the game plugin via the SimTools Game Plugin Updater.
Make a Custom Game Profile
Once of the nice things that the Game Manager allows us to do is if we have followed all the right instructions in the setting up of the Game Engine, mainly setting up the default profile correctly.
We can now modify the profile without leaving the game. This is best done with the game in a window and the Game Manager open next to it.
With the Game Manager open:
- Press Profile Editor.
A new window will pop up and this is where we can create and save custom profiles on the fly.

You will then notice there is a button box labelled on the top which contains:
- Main – where you are now and where you can change game quickly and change the Main Level of % to make the Game Motion less overall.
- Editor – where you can edit each force and save your new profile.
- More – Is where you can check the details of the plugin and modify the three extra forces the plugin may contain for example Traction Loss.
Main
In this section it is split up into three areas, all serve their own functions, first on the top is a nice banner showing the Game Plugin selected plus in the upper right corner is the name of the people(s) responsible for writing the actual game plugin. A nice way to say thank you. The second area labelled Main Setting is where you can select a game plugin, a quick way of moving through the game plugins that are installed. Press the down arrow and a list of game plugins installed will appear, simply pick the game plugin you want from the list and watch the banner change and now you can work with that one. The Main Level % can be used to lessen the overall movement of the sim. Simply move this slider and the percent will represent the overall used by the Game Engine to drive your simulator. Thirdly the bottom section shows the forces available in the plugin, if your wonder what forces you need to setup in the Axis Assignment this will show you.
Editor
Now to actually edit a profile:
- Press Editor in the top button bar.
- Press Copy to copy the default profile and give it a new name.
- Press Ok to begin to edit this newly created profile.
- Now move the sliders and test in game until you are happy with the motion.
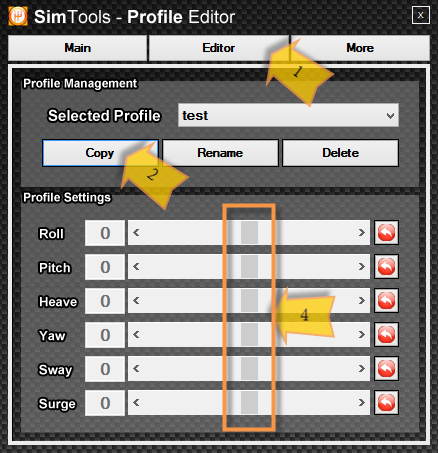
Your custom profile is now ready and can be selected on the fly in the front page of the Game Manager. Now for any reason you don’t like this, you simply press Delete and it is removed, on the other hand if it’s just the name you don’t like press Rename and give it a better name.
More
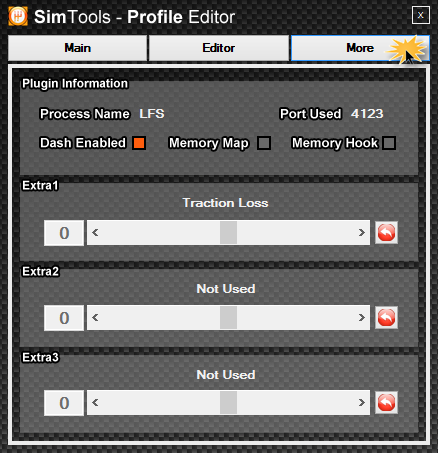
In this panel we can check what is contained within the game plugin. As per the picture below you will notice in the top area named Plugin Information it has:
· Process Name – This is the name that appears in the process section of the task manager for Windows and if you Game Manager will not patch the game please check here and you can see if the actual game exe name is different, please if this found to be true, report the details to the game plugin creator so he/she may update this for you and any other user in the future. SimTools grows with help of its users.
· Port Used – is the UDP port that the Game Plugin uses to send the data too, if your data doesn’t seem to be passing to the Tuning Centre and the Game Manager’s status is Blue with Game Running, you may have to exclude this port from your firewall software.
· The next three check boxes – If checked (orange dot) shows how they obtain their data as well whether they support the Dash Out data for Dashboard Support.
The next three sliders that follow the above information are the Extra Forces that may be available in each game plugin and can be dealt with the same and do save in the editor if you are changing them for the default profile or a custom one you have created.
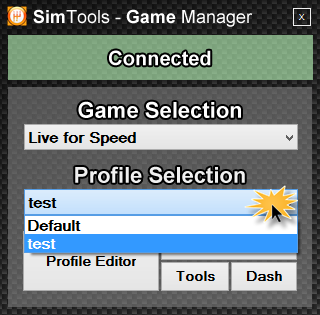
Selecting the Profile to use in Game
There comes a time when the default motion profile does not suit the car or plane we have change too, so instead of going through the lengthy process of tuning a profile again we can do as explained in the above section of the Profile Editor. Now we can quickly change our profile without ending the game. We can simply select the profile in the front screen of the Game Manager under Profile Selection, and the Game Engine automatically picks this up for us and modifies the values accordingly, without you worrying about it. Which allows you to go straight back to enjoying your favorite game.
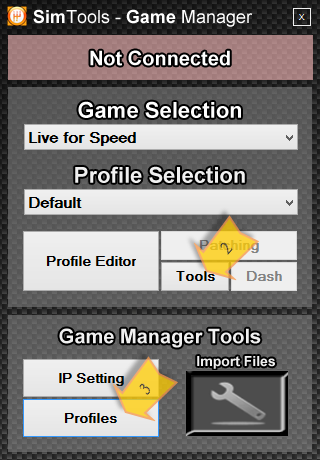
Using the Tools
Include in the Game Manager is a list of tools, their functions are as follows:
- IP Settings – If using two computers with the Manager separate to the Engine.
- Profiles – Access to all your game profiles stored in the Game Manager.
- Import Files – A simple Drag and Drop to import Game Manager related files.
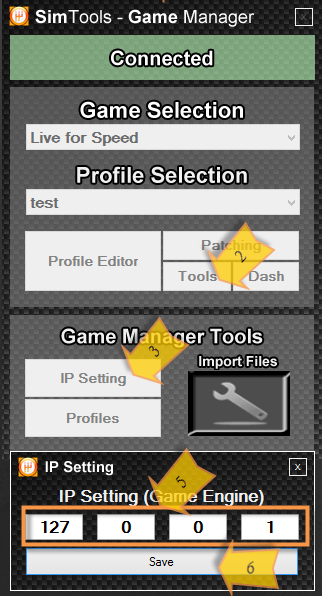
IP Settings
- Open Game Manager from the status bar.
- Press Tools.
- Press IP Setting
- Press Ok.
- In the next window please change the IP setting to match the IP of the Game Engines location.
- Press Save.
Note that if this game is already patched you will have to later follow these instructions in order for motion to be present from this game again. Please stop the game after changing the IP Setting and Un-Patch and Re-Patch the game again, Thank you.
Profiles
Here you can gain access to copy your profiles so they may be posted to a web site or attached to an email in order to send them to someone.
Please note if you do not copy and just move them you will no longer be able to use them anymore. Please be carefully.
- Open the Game Manager from the system tray.
- Press Profiles.
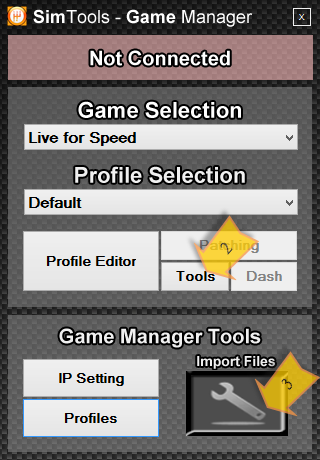
Import Files
Now you have received a Game Manager profile from somebody, What do we do with it? Well with in the Game Manager we have a simply drag and drop box to import such files.
- Open the Game Manager from the system tray.
- Press Tools.
Now we can simply drag and drop the supplied Game Manager Profile to the Import Files box (3.) And the Game Manger will then install this to the right place ready for you to use it.
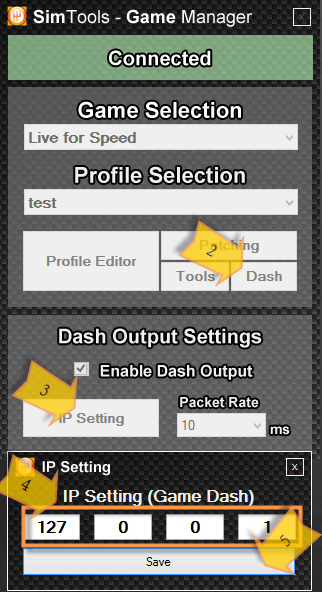
Setting up the Dash
With the Dash Output settings you to set the pack rate for the data being sent to the Game Dash to send it to the micro controller or peripheral it communicates with, as well as setting the IP address if this is connected to a different computer on your network.
IP Setting
Here if the dashboard or peripheral is located on your network, for example is run of a second computer. You need to change the IP Setting in the Dash.
- Open the Game Manager from the System Tray.
- Press Dash.
- Press IP Setting.
- In the IP Setting window set the IP Address to the computer it is on.
- Press Save.
Now the Game Manager knows which IP Address to send the Dash data too.
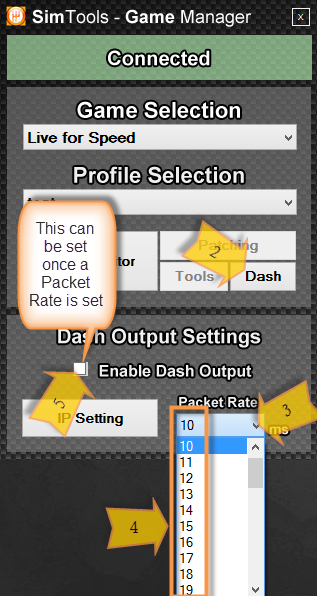
Packet Rate
Now with the packet rate is the time that the dash out pauses between sending the data to the Game Dash .This in turn give the Game Dash time to do what it needs to do before another set of values are sent and is needed in order to keep a nice constant flow of data. As well when not set the Enable Dash Output will not be able to be selected.
To set the packet rate desired.
- Open the Game Manger from the system tray.
- Press Dash.
- Press the drop down arrow in the Packet Rate.
- Select the packet rate desired.
- As well you will notice now you can check the Enable Dash Output so it will now ready to send information via the Dash App.
Now that the packet rate is selected at any time you wish to stop or start the dash output it can be controlled by checking the Enable Dash Output box. And if it seems the Game Dash is not coping with the speed of the packet rate this too can be adjusted to a higher number in order for the Game Dash to cope better.