
Quickstart Guide for SimTools!
Guide for SimTools 2 will be updated soon!
Following this, step after step, is a quick way to achieve your first basic functional setup and make your simulator come alive.
For detailed explanation use the complete user guide:
http://www.xsimulator.net/simtools-complete-documentation/
Find a russian translated version at:
http://mal4x.ru/viewtopic.php?f=6&t=379
A LITTLE ABOUT SIMTOOLS
SimTools is designed to be a simple set of tools that work together to get motion simulators up and running as fast as possible while still giving the user all of the customizations and flexibility they may need.
One really cool thing SimTools will allow you to do is “Live Tuning of Profiles”! Create a profile for a game and then tune the profile to perfection while playing the game!
You don’t have to stop the game to make changes to the profile being used!
A LITTLE ABOUT THIS GUIDE…
Just follow this step-by-step guide from points 1 to 10 and you will make your simulator move accordingly to the default profile! Enjoy!
Requirements
a) Mandatory :
- Windows XP, Windows 7, Windows 8
- Microsoft .NET 4
b) Optional :
- A second computer connected to your Game computer makes fine tuning very comfortable. But it’s optional.
- (Directly Connected Network Cards with a crossover cable for best performance!)
Installation To do list
Please follow these all of these steps consecutively:
first: downloads
- ATTENTION: Microsoft Dot Net 4.0 is mandatory. So it is required that you start by installing it now http://www.microsoft.com/en-us/download/details.aspx?id=17851
- Make sure your Windows screen text is set to 100%. (Instructions can be found here)
- Install SimTools
- Download the Plugins related to your favorites Games which can be found in the resource section.
- Do not unzip the plugin files! They are used as is.
- As for „Life For Speedtm“ this is preset into SimTools, you can download the demo version of Life For Speedtm here: http://www.lfs.net/?page=downloads
- You must run the game at least once in order to successfully patch it for Output.
second: SimTools installation in detail
- Download the latest version [here]
- Extract and run SimTools
- The typical installation directory is „C:Program Files (x86)SimTools„
- Select Full Installation if you run only one PC. (If you have a dual-PC setup, you have to run the installation program on both PCs individually. In that case, select GameManager installation on the PC that runs the game; Select GameEngine installation on the PC, the controllers are connected to.)
- Select Launch GameEngine and Launch GameManager at this point in time prior to clicking Finish on the last screen of the installation routine. This will allow you to become familiar with the application but if you plan to use more games than Life for Speedtm please close both Game Manager and Game Engine before proceeding.
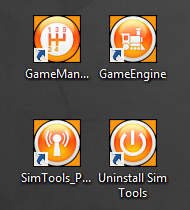
- You will get now 4 executables: Game Engine, Game Manager, Game PluginUpdater, Uninstall.
Plugin import
- Check in the System Tray for Game Engine and Game Manager and make sure they are not running. If so please close them before proceeding.
- Run the GamePlugin Updater.
- This program can be found also in the SimTools directory (most probably C:Program Files(x86)SimTools SimTools_PluginUpdate.exe)
- Drag&drop the plugin-zipped file into the PluginUpdater. There will be a confirmation if the plugin installed correctly.
- If you use a 2 PC setup, Install the plugin on both PC’s
- Once this is successful, the profile will be available within Game Engine and Game Manager.
- Close SimTools GamePlugin Updater.
Patching the game
- Run GameManager and GameEngine Note: If issues arise in patching games right click on the icons and select „Run as Administrator„.
- If the GamaManager window doesn’t open automatically, double-click on the tray icon for the GameManager to open the GameManager window
- Select the game you want to play from the Game Selection drop-down list.
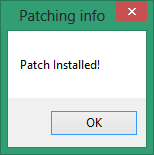
- Press „Patching“ to first patch the sim program. Follow the instructions of the individual plugin and then press Patch Game.
- There should be a confirmation message when the game is patched correctly („Patch Installed!“).
Setting up Simulator axis
a) Definitions
If your simulator is powered by several actuators. Consider that each actuator is seen by Sim Tools as an Axis. SimTools can extract up to 9 telemetry data („DOF 1“ to „DOF 9“) from the games and can handle up to 6 actuators („Axis1“ to „Axis6“).
This step in the tutorial will let you indicate to Sim Tools the data mixing to operate before sending instructions to your simulator’s interface along to your simulator configuration. Some standard configuration is preset: e.g „SimForce GT“ is a seat mover with two motors connected to the back of your seat.
b) Setting up the „Default“ axis assignments
First, we must define the „Default“ settings that we want SimTools to use, later you can customize this.
- Right-click on the GameEngine tray icon
- Click on the Axis Assignments button
- Under Game List drop-down (Axis Assignment 1) select Default
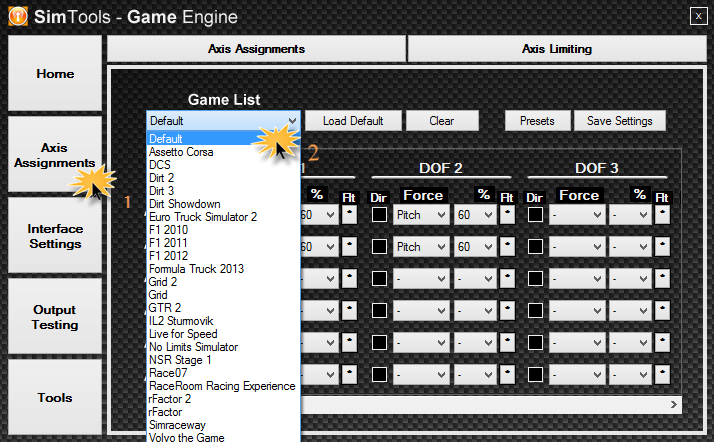
- Click on the Axis Assignments second tab
- Select a preset from the Presets drop-down list for your simulator
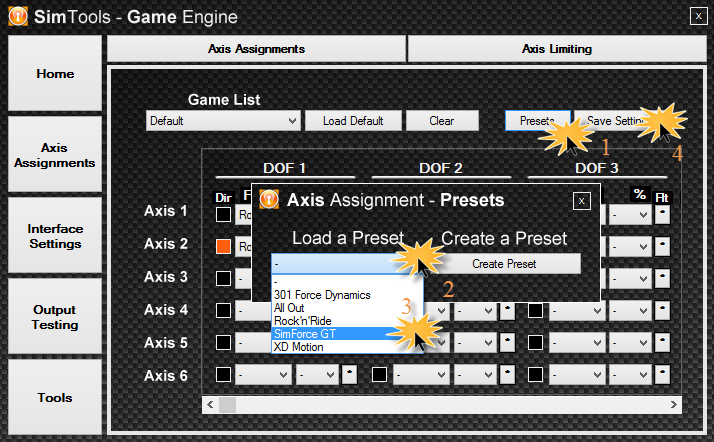
The tab automatically switches back to Axis Assignments Tab 1
- Select Default from the Game List and click on Save Settings
This is a first very basic setup showing just the roll and pitch from the game.
With more experience, you can also add some % of Surge to simulate acceleration and braking or Heave for road bumpiness.
c) Warning
Be sure to set up your “Default” Axis Assignments profile as this becomes the first game profile when you install a new game plugin:
- When using Output Testing, the Axis Assignments Profile that is used is the “Default” profile. If you have not set up this profile, you will not get any output.
- The “Default” profile is also copied for each new game installed as a starting place for the Axis Assignments for the new game.
Remember:
- Axis 1 to 6 are the motors of your simulator
- DOF 1 to 9 are the game data extracted by the plugin
Communicating with the simulator
Sim Tools supports up to 6 different interfaces!
They are selectable in the 6 tabs
Interface 1 – Interface 6.
a) How many interfaces are needed?
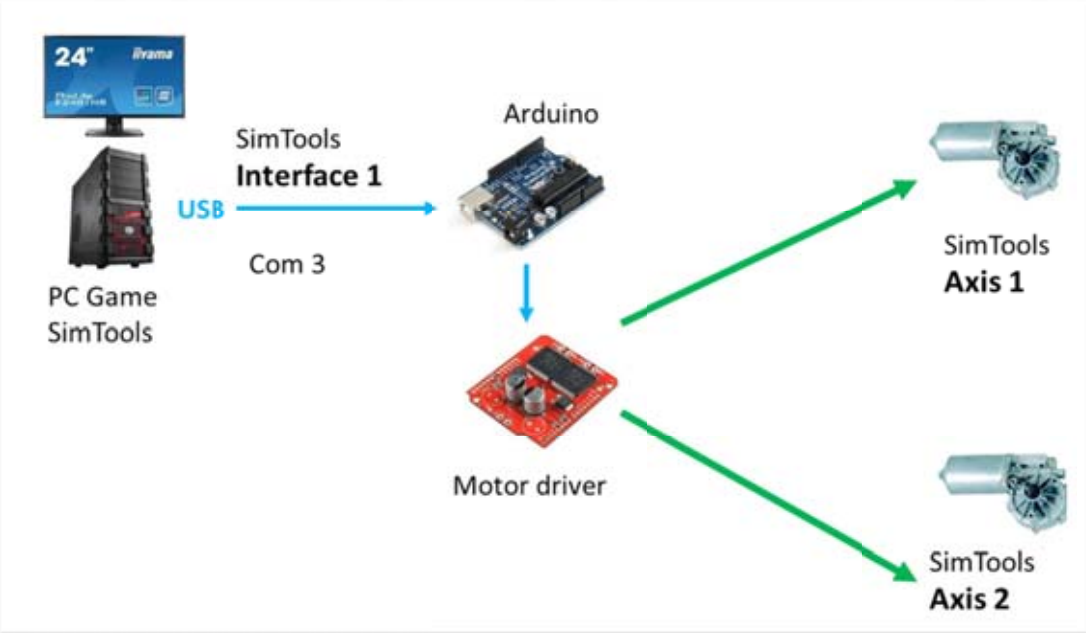
For a 2 DOF „SimForceGT“, there is only need for 1 interface if you use an arduino board which is able to drive 2 actuators.
The following steps are only for example purposes and treat the Arduino and JRK interfaces. There are another interface available, e.g. SimAxe or Kangaroo Controller. Look in the forum for more information about it.
Example setup for Arduino:
[gard]
Arduino is connected to Windows COM3
SimTools „Interface 1“ sends to COM3 the concatenated information of Axis 1 and of Axis 2.
Arduino will dispatch the data sending Axis 1 orders to Actuator 1 and Axis 2 orders to Actuator 2
Example setup for JRK interface
You need 2 JRK 12v12 boards. Each JRK drives its own actuator
- JRK1 connected to COM4
- SimTools „interface 1“ sends the information for axis 1 to COM4
- JRK1 sends commands of axis 1 to actuator 1.
- JRK2 connected to COM6
- SimTools „interface 2“ sends the information for axis 2 to COM6
- JRK2 sends commands of axis 2 to actuator 2.
Refer to Eaorobbie’s post here for step by step startup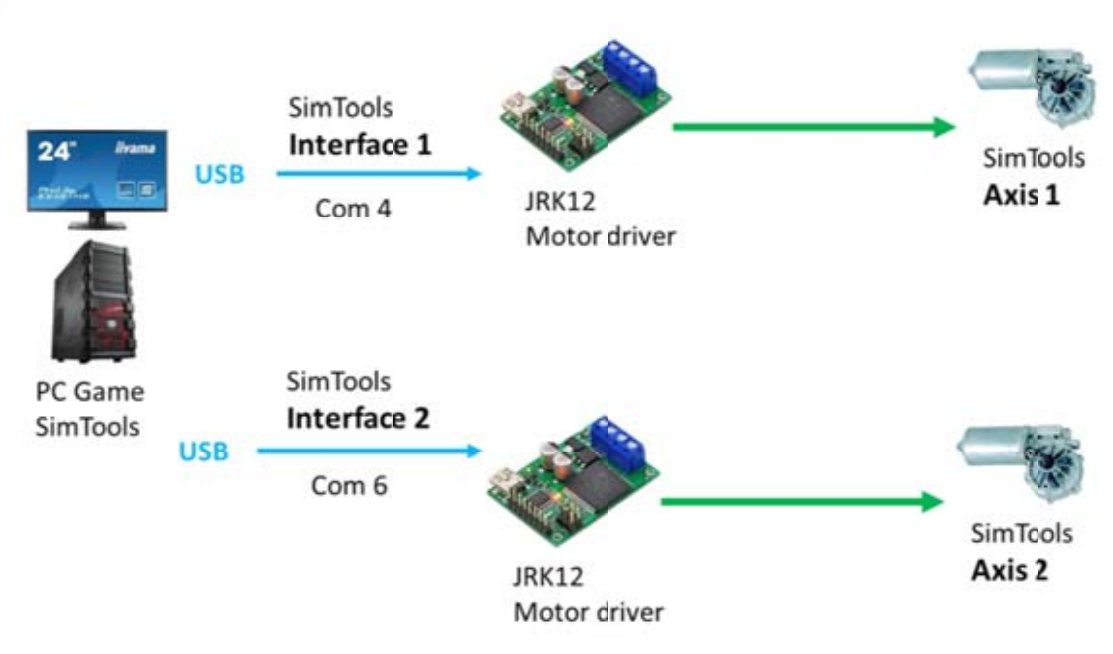
b) Possible types of interfaces
Basically, you will use „USB Serial interface“ to control your Arduino or JRKs.
(NET interfaces are used for LAN connected interfaces: this is not described in this Quick Starting guide).
Click on the Interface Settings button.
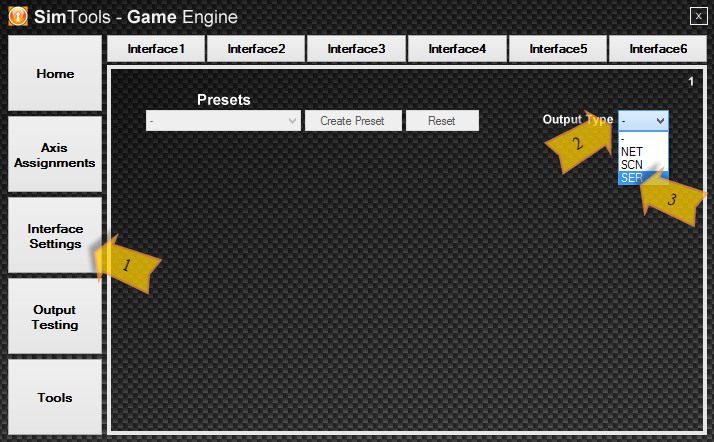
- Select Interface 1 to set up your first interface.
- Select the Output Type – typically „SER“
c) JRK Game Engine interface settings
- If you are using JRK’s select JRK 12bit from the Presets drop-down list. Otherwise, select the correct ComPort settings as provided by your controller manual.
- Select the ComPort your controller is connected to.
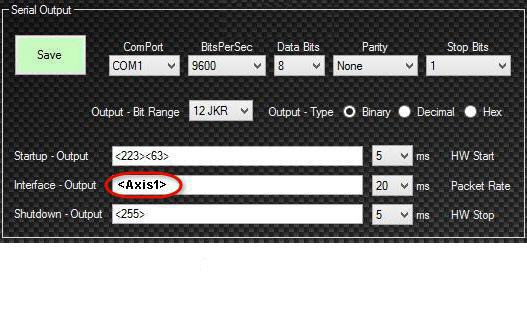
Click on Save
- Select Interface 2nd tab
- Again, select SER and the correct ComPort settings as before with Interface
- Enter <Axis2> in the Interface – Output!
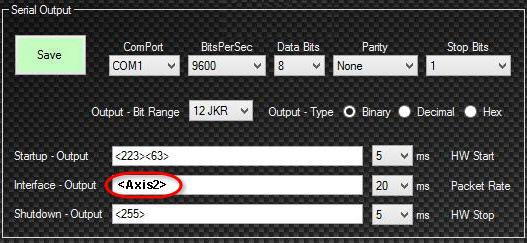
Click Save
d) ARDUINO Game Engine interface settings
Interface 1 only:
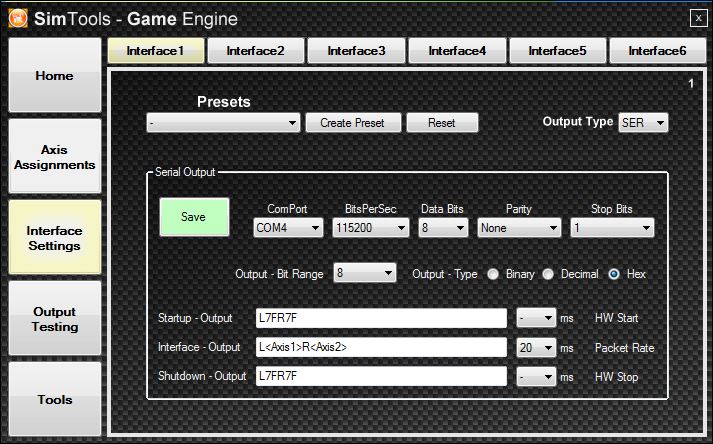
Thanks @nclabs
- Click on Interface Settings, Interface1, Output Type and select SCN.
- Under ComPort, select one of the COM ports connected to you SCN5 (if you don’t know it, check the Control Panel on Windows, under the COM Port section).
- Under Packet Rate select 10 ms.
- Under Assignment Axis, select Axis 1.
- With the Speed bar, you can adjust the speed of the actuator, select a temporary value of 10.000 (value that you can increase after some testing).
- With the Acceleration bar you can adjust the acceleration of the actuator, select a temporary value of 500 (same thing here, you can increase it after).
- Now do the same thing with the Interface2, using the other COM port, and selecting Axis 2 under Assigned Axis (important!).
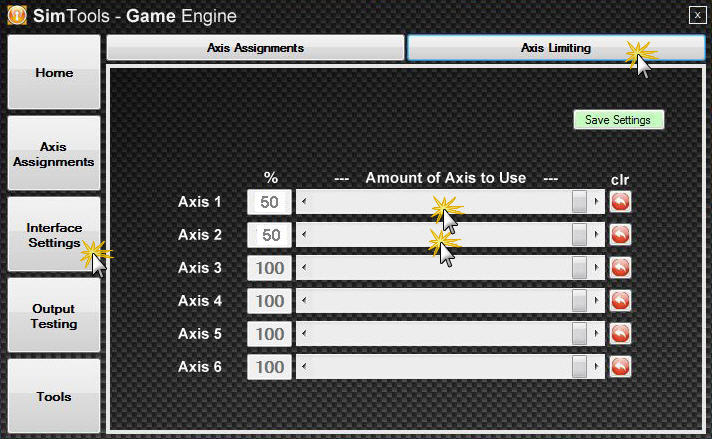
- Last thing. Click on Axis Assignment, Axis Limiting and, to any axis connected with a SCN actuator, select a value of 90%. This is very important to preserve your actuator in the long term. Not doing this can lead to mechanical damage.
Moving your Simulator (with mouse controller)
Let’s move your simulator without any game input with simply using your mouse!
Its is recommended to test first manually your simulator before testing any game output.
- Plug in your serial connection between your computer and your simulator.
For example, a USB cable between your computer and your arduino/JRK 12 - Game Engine / Output Testing
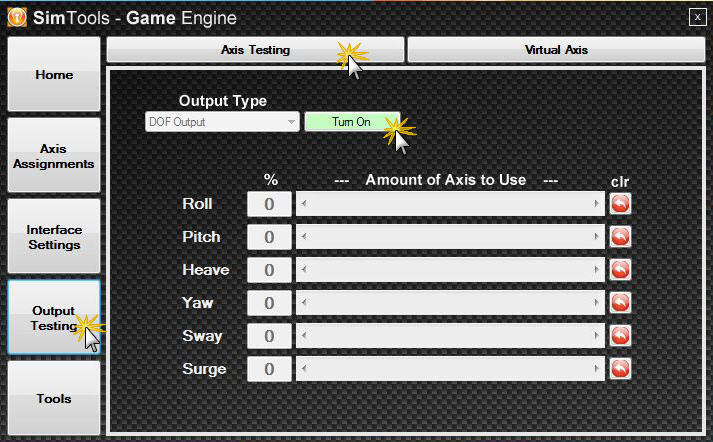
Click on Turn on
Select Axis Output
Now, choose an Axis and slide gently the slider with your mouse!
As an Axis corresponds to an actuator, you will see the selected actuator moving!
Axis limitation is not active for this testing purpose.
The smoothness depends on the refresh rate (try below 10 ms).
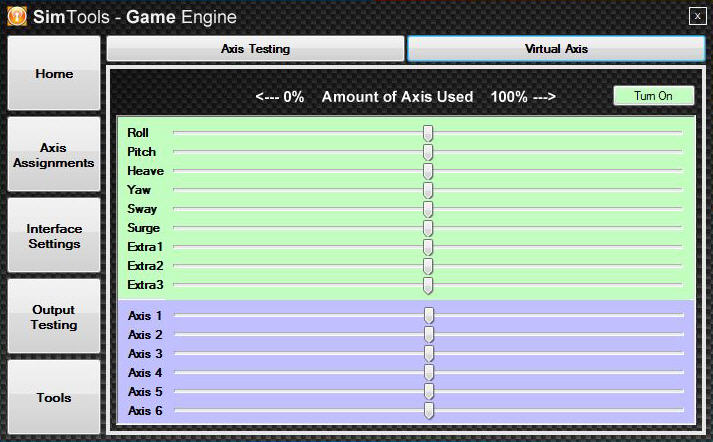
Checking the direction of movements
Now we need to test that the simulator behaves correctly: if the game plugin sends „tilt left“, the simulator has to tilt left and not right!
You can invert the motor wiring … or invert the DOF in the „Axis Assignments“ 😉
With the slider, we will manually make sure that it is rolling and pitching in the right directions.
For this example we find
Roll : 100% – Tilts Left
Roll : – 100% – Tilts Right
Pitch : 100% – Tilts Forwards
Pitch : – 100% – Tilts Backwards
We have to follow the coordinate system that is in place in the Sim Tools Plugin API reference – see http://www.xsimulator.net/co-ordinate-system/
We know from that in Virtual Axis when it Tilts Left – Roll is all the way Left
Tilts Right – Roll is all the way Right
Tilts Forward – Pitch is all the way Left
Tilts Backwards – Pitch is all the way Right
Virtual Axis can be found next to the „Axis Testing“ tab and can be turned on by pressing „Turn On“
So to correct to the coord’s we need to invert the Roll and invert the Pitch or our games will not produce the right directions of movement.
Once we have this all set up including Heave, Sway and Surge we can then go on and patch a game and begin to test the motion and fine tune it to your Sim.
Visualizing game´s data extraction
Click on Output Testing.
Don’t connect the motors yet.
- Click on Virtual Axes and on Turn on.
- Run the game.
If everything is set-up correctly the sliders should be moving.
You can now see that SimTools can read the Game data!
Note: If you only want to test the slider movements and don’t have 6 ComPorts, just write
<Axis1><Axis2><Axis3><Axis4><Axis5><Axis6>
into the Interface – Output line.
Starting your Simulator
[gard]
A) security approach
The first step, the Security approach: in order to preserve your hardware, begin the test by lowering the range and the intensity
- Via the GameEngine / Axis Assignments / Axis Limiting: reduced to 50%
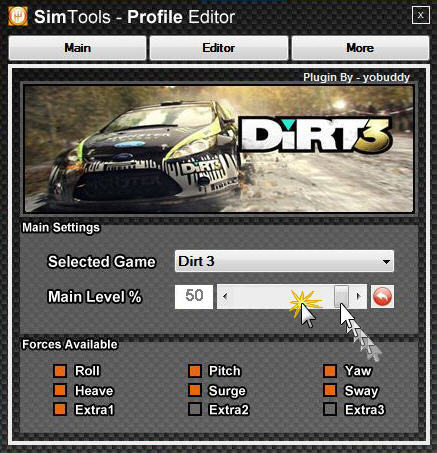
- Via the GameManager, open the „Profile Editor“ window in the Game tab / Main settings: put the Main Level to 20% to preserve your actuators
B) The second step, starting the sequence:
- Launch Game Engine
- Launch Game Manager, select the Game Profile in the drop-down menu
- Launch the game, start a race! The playseat comes alive…
C) Increase the levels:
– Don’t Skip –
Increase the levels until simulator’s movements are satisfying.
For Best Performance, make sure the profiles Main Level is back to 100%. Also make sure that your simulator Axes Limiting are set back to 100% once you are all setup. SCN actuators may want to leave the Axes Limiting at 90% to avoid damage to the actuators rod ends.
Conclusion
Congratulations, you have now completed the Quick Start Manual!
To learn more
Please refer to Complete Documentation
http://www.xsimulator.net/simtools-complete-documentation