Installing SimTools
Downloading SimTools.
http://www.xsimulator.net/simtools-download/
Installing SimTools for the first time.
Now that we have downloaded SimTools open, the archive that you have received and then double click the icon to open the file browser in order to install the application.
Now to continue, Double Click SimTools_vx.x.exe in order to start installing it.
Click Next to continue, please read the Licence Agreement and if you agree please check the radio button I accept the agreement then Next.
Next you will be asked to select the destination location, please change if you wish to install SimTools to a different location. The manual uses the default location and you will need to remember this location when we refer to the installation directory.
Once you have selected your destination directory click Next to continue. Ok the next part needs to be considered carefully, options are:
- Full Installation – Select this one if you wish to only uses one PC, for example the game and motor controllers or any other peripherals is all running off one PC.
- Game Engine Installation – Select this if using two PC’s and should be on the PC that you are running the motor controllers or other peripherals from.
- Game Manager Installation – Select this if using two PC’s and should be on the PC that the Games are actually running on.
Once you have selected the components to install, please set the menu name that you wish to appear in the Start menu and click Next.
Next is the option to create a desktop icon (recommended) or to create a Quick Launch icon.
Click Next once you have selected one or both. Then in the Ready to Install you can check on everything you have selected previously and if any changes needed feel free to click “Back” to make any changes necessary.
Once happy with you selections continue to install by clicking Install. SimTools will then install as per your requests. At the end of this there will be another two options that we recommend leaving so one may check the application has successfully installed plus helps to familiarize yourself with the way it is laid out.
Now if using a second PC you will need to follow the above instructions but select 3 if you are now installing SimTools on the game machine, or vice a versa. If you are only planning to playing Live for Speed© you are ready to start setting up your default axis
[gard]
Overview of SimTools.
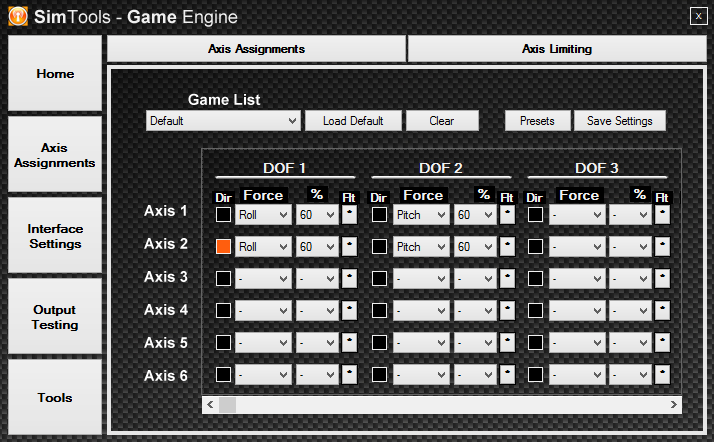
The Game Engine
The Game Engines main task is to drive your simulator from the game values that the Manager is sending. Plus setup and manage any interfaces that you have setup.
Contained in the Game Engine we have a button list on the right hand side as follows:
- Home – This is where a picture of your simulator will be placed, explained in Chapter x. Please refer to this and makes your copy of SimTools personal.
- Axis Assignments – Here you can setup the axis of the simulator as in how you want the forces to act when everything is running
- Interface Settings – This will be where you enter the details for setting up the motor controllers, etc. that you will to use with SimTools.
- Output Testing – Here you will be able to test your interfaces without using a game output. The Default axis settings are used here.
- Tools – Here is where we can use tools selected for Game Engine to use, clear our home page, Manage our presets and set the priority of the Game Engine.
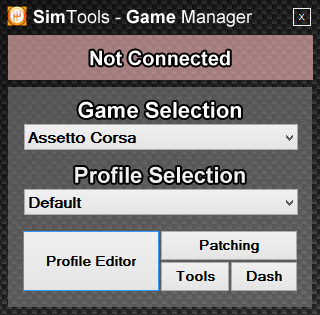
Game Manager
The Game Managers main task is to patch games and transfer this information to the Game Engine for processing to the Interfaces setup by your settings and for creating game profiles and setting up the of the Game Dash.
The buttons contained in the Game Manager have the following functions:
- Top bar shows the status of the Game Manager, whether it is connected to the Game Engine or if a game is currently running.
- Game Selection – Allows you to select a game plugin that you have installed via the Plugin Updater.
- Profile Selection – As it states you can select the default profile to run when a game starts or a custom profile that you have written in the Profile Editor.
- Profile Editor – Is where you can build a custom profile that can be selected via the Profile Selection and can be change live while in the game and can be modified while still live in the game selected.
- Patching – As it name suggests is where you patch a game with the plugins so that Game Manager may send data to the Game Engine.
- Tools – Here we can select tools that you have setup in order to help you in the Game Manager and also contain the area where you can access the profiles created in the profile editor, so you can copy and send them to someone else to use. Also contains the area where you can drop profiles that you have obtained by someone else all these operations.
- Dash – Allows you to initiate the Dash out available in certain games as well be able to set an IP address if the dashboard is on another IP Address.